(Recovered from my old article - originally posted on 2016.02.25 02:59 KST)


(Note: This is English version. If you want to see Korean version, please visit http://ko.sdndev.net/10.)


There was the first local OpenStack Upstream Training in Korea on February 18, 2016, Thursday.

It was announced with OpenStack Days Korea 2016 (http://event.openstack.or.kr/program.html).

The announcement for OpenStack Upstream Training in Korea 2016 is as follows:


TrackV : OpenStack Upstream Training
Overview It is great honor to hold the brief version (160 minutes) of Upstream Training, which originally takes two days.
Upstream Training is designed to be practical for OpenStack Upstream Open Source developers. More information on Upstream Training is available on http://docs.openstack.org/upstream-training/ 
This local training is organized with shorter version of official Upstream Training, with Korean translated slides.
Date & Time February 18, 2016 (Thu), 13:00~16:10 (total 160 minutes)


Online engagement (e.g., IRC, Mailing List, Slack, ...) is recommended.
Location Track V (Ruby&Jade), 3F, Jamsil Lotte Hotel    See location
Expected # of Trainees 30 people Early registration is needed    Early registration
Fee Free (requirement: OpenStack Days Korea 2016 registration)
Preparation Laptop with Wifi
(Recommended: Ubuntu 14.04 + 4GB RAM VM for DevStack)
Staff Ian Y. Choi (preparation, training, assistant)
Stephan Ahn (preparation, training, assistant)
Sungjin Kang (preparation, training, assistant)
Namgon Lucas Kim, Junsik Shin, Jungsu Han (GIST - attended Tokyo Upstream Training, assistant & mentoring)
Reference 1. OpenStack Upstream Training Official Document (docs.openstack.org/upstream-training)
2. My OpenStack Upstream Training Experience (before Tokyo Summit) by Ian Y. Choi
※ The detail schedule is subject to change.


Total 35 people were pre-registered for the training, and 29 people attended. Among of them, 24 people actively participated in the training with Etherpad and Ubuntu VM.


Photos were taken by ujuc! :) Also, you can find Etherpad on https://etherpad.openstack.org/p/upstream-training-korea-2016 and translated slides on http://docs.openstack.org/ko_KR/upstream-training/.


Thank you very much for all the attendees, and I really appreciate overall help from many staffs!

(Recovered from my old article - originally posted on 2016.02.16 10:02 KST)


Last January, I shared my presentation to explain the followings:


Title: Open Hardware & Sources + Azure for an use case: indoor positioning

- Slide: http://1drv.ms/1PAOx3n


It explains why I chose Azure for one use case: indoor positioning application. I used one Linux virtual machine in Azure for the use case.


Moreover, from slide 8, you can see how Dashboard is different: between Azure and OpenStack.


If you want to see the demonstration video, please see

http://1drv.ms/1LqxPQc


(Recovered from my old article - originally posted on 2016.02.02 00:05 KST)


I participated in OpenStack study on last Friday. In the study, there were two presentations 

which study attendees wanted to listen to, but could not see last year. Moreover, attendees discussed 

how we could study more effectively in 2016.


Facebook notice: https://www.facebook.com/events/1711379062437713/

 
I would like to briefly summarize those presentations.
 

1. codetree: Installing OpenStack using his shell scripts in more automated manner


He already presented the topic on last July. However, last week, he presented more details with updated shell scripts: version 2.

The followings are main changes compared to version 1

: Extracting and unifying duplicated functionalities into shell script functions => "common" directory

: Tested how nova-docker is installed and how we can create Docker instances

: Tested OpenStack installation base virtual machine images using PXE


Shell script sources are available on: https://github.com/openstack-kr/study_devops.


The scripts are so convenient that we do not iterate much manual stuff.

One of remarkable things is that the scripts followed official OpenStack installation guide (Kilo).

For example, "kilo-step-01.sh" means that the script file follows Chapter 1 in OpenStack Kilo installation guide.

So, by studying the scripts, people can better understand how we install OpenStack with official installation guide.


- Slide link: https://onedrive.live.com/redir?resid=4A848F40E8EF8761%21572


2. Sungwon: HA using DVR


He presented last week because he could not attend on last December.

DVR (Distributed Virtual Router), which was integrated in OpenStack Juno release,

enables to distribute lots of network services, which were previously maintained in one Neutron server instance.


I was so impressed by his presentation because he customized codetree's shell scripts.

He forked codetree's GitHub repository, and added DVR installation and integration into his forked repository.


- Slide link: https://onedrive.live.com/redir?resid=4A848F40E8EF8761%21575


(Recovered from my old article - originally posted on 2014.12.12 08:13 KST)


I attended "Online MidoNet Network Virtualization Meetup" on last 09 Dec (URL: http://www.meetup.com/Online-MidoNet-Meetup/). This article briefly talks about this webinar and my experiences installing Midostack.


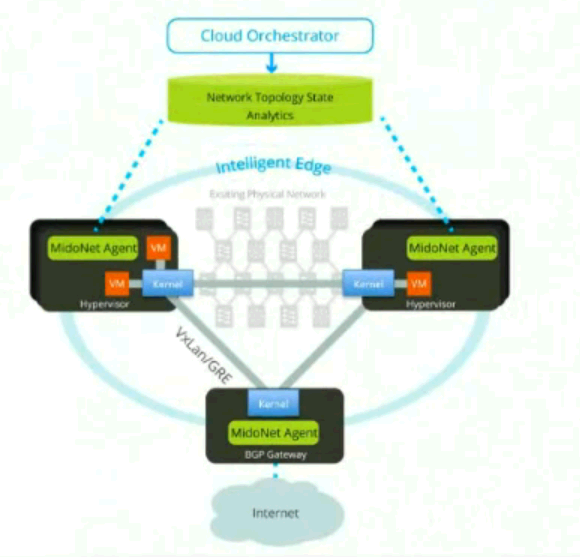
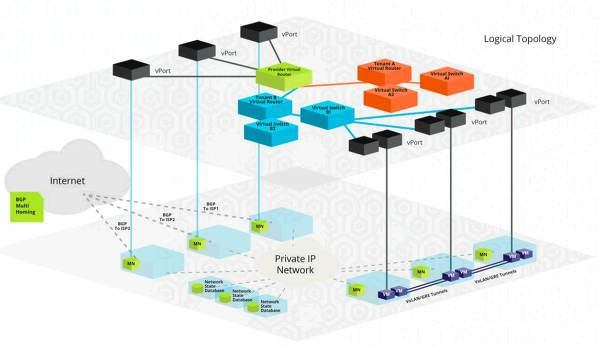
Midonet from Midokura is designed to provide the following network functionalities by placing a network virtualization layer between cloud management platform layer (e.g., OpenStack) and Hypervisor layer (e.g., KVM).

 - Logical Switching: decoupling Layer 2 and Layer 3 in physical networks

 - Logical Routing: supporting routers in virtual networks

 - Logical Firewall: kernel integrated, high performance, distributed firewall

 - Logical Layer 4 Load Balancer: application load balancing in software

 - API: integrating with cloud management platforms using RESTful API

Midonet is a open source following Apache 2 license, aiming at open, and user- & vendor-neutrality for production network.


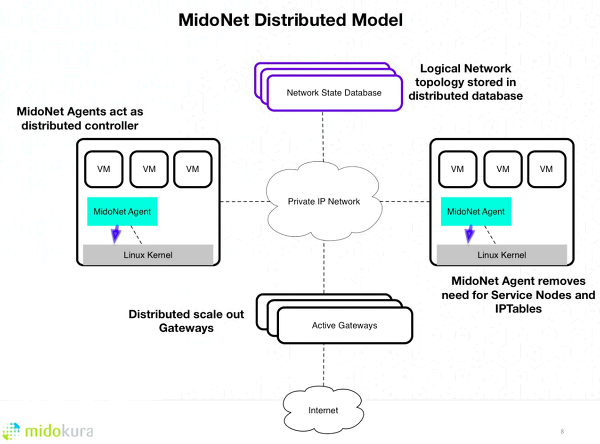
According to Midokura, Midonet implemented functionalities in a Kernel level and interacts multiple hosts with MidoNet agents, so creating and managing logical topology such as overlay network are easier.


Midonet chose a distributed model, not a centralized model to address failures (e.g., SPOF, active/stand-by failover), scalability, and network efficiency issues.


Midostack is degigned to experience Midonet with OpenStack, a open source cloud management platform. When you install Midostack, DevStack is automatically downloaded and executed, so Midostack is for Midonet open source contributors and the people who want to learn Midonet. Currently, Micostack only supports Ubuntu 14.04 Linux distribution, and when you want to deploy Midonet for production environment, Packstack RDO running in CentOS or RHEL7 is recommended (URL: https://openstack.redhat.com/MidoNet_integration). It operates with OpenStack Icehouse release.


Also, more details on Midonet and "how to contribute to Midonet" were well explained in that Webinar. I think some slides will be open soon.


I have been so curious how Midostack runs OpenStack with DevStack scripts. So, I installed Midostack and executed several midonet-cli commands. The followings are my basic configuration to install Midostack.


- Virtualization platform I used: VirtualBox 4.3

- OS: Ubuntu 14.04 LTS (64 bit)

- Basic configuration: 8GB RAM, dynamically allocated disk with 50GB, NAT configuration

(Midostack by default assumes that the public network range is 200.200.200.0/24. If you want to test network functionalities, please configure some setting files before installing Midostack, or please configure proper network settings in VirtualBox.)


It is easy. You can just input the following commands, according to http://www.midonet.org/#quickstart, with a few assumptions:


- Your Ubuntu 14.04 should be up-to-date. (If not, please execute 'sudo apt-get update', 'sudo apt-get upgrade', 'sudo apt-get dist-upgrade', and 'sudo reboot'.)

- You need to install 'git'. To install git, please execute 'sudo apt-get install git'.)


 $ git clone http://github.com/midonet/midostack

 $ cd 

 $ ./midonet_stack.sh


After executing those commands, the latest source codes of Midonet, DevStack, and OpenStack components are downloaded, installed, and some basic logical routers used by Midonet will be successfully configured.

(About two weeks ago, I needed to install the latest protobuf version, but now it seems that it has been resolved when you install Midostack using the latest scripts from git.)


But, unfortunately, my installation failed when creating a logical router after installing DevStack. I asked to IRC community, and one guy gave me a solution: 'execute ./midonet_unstack.sh and ./midonet_stack.sh', and after then it works very well! (Thanks, tfukushima!)


Successfully installed similar to DevStack! with some additional stuff related to Midonet.


Horizon: by default, 200.200.200.0/24 public network has been created. I created one VM instance.


The following figure illustrates my execution of midonet-cli console. Using midonet-cli, I can check tenant lists in OpenStack. Also, I can check lists of logical routers, their ports, hosts, and chains for pre-routing and post-routing for routers.


It seems that I can experience more if I configure Midostack with multi-nodes. I simply discussed it to IRC, and a guy highly recommended me to configure multi-node environment with Packstack RDO. Please just refer to this information (This information might be very helpful for some guys who want to configure midonet with multi-node environment I think.)


[References]

http://www.midonet.org/#quickstart

- Slides from "Online MidoNet Network Virtualization Meetup" (http://www.meetup.com/Online-MidoNet-Meetup/)

http://komeiy.hatenablog.com/entry/2014/11/13/012401

- Midonet IRC!

(Recovered from my old article - originally posted on 2014.11.15 21:51 KST)


This article explains how I successfully translated Japanese Ryu-book to Korean even though I am not well familiar with Japanese. I used VisualTran Mate (http://en.visualtran.com/?type=en) software as a translation helper tool.


Ryu is a SDN controller which is written in Python. The Ryu-book (https://osrg.github.io/ryu/resources.html) explains how to develop SDN applications using Ryu controller with a very illustrative manner. And, on April, I found that all the texts and book publishing tools are uploaded to Github repository (https://github.com/osrg/ryu-book). I also found that all the translation procedures are fulfilled by git commits. This is why I finally decided to translate that book to Korean. I really wanted help more Korean people to see this illustrative book.


At the first time, I have no privileges on editing osrg/ryu-book git repository. So, I forked that repository. After commiting my translation results to my forked repository, then I can make a pull request to this original repository. The bottom figure shows my forked repository for ryu-book.


To do translations on my computer using this data, I needed to retrieve that source to my computer. I executed 'git' command and cloned that forked repository to my computer.


The original Japanese texts are written as *.rst files. Those files are fully text files with UTF-8 format. 


VisualTran Mate program supports MS word (*.doc, *.docx) files, but text files can be open very well in MS word. So, I opened rst files in MS word. The bottom figure shows 'rest_api.rst' file opened from my MS word program.


You can find that VisualTran Mate ribbon menu is loaded in MS word. When I click a VisualTran Mate  icon, that program is executed and automatically detects a source language (Japanese) and a target language (Korean, because I am using Korean WIndows). 


The bottom figure shows machine-translating using Microsoft Bing. VisualTran Mate supports machine-translation using Microsoft Bing.


However, the translation quality of machine-translation results is not good enough to liberally read in Korean, although it is said that the accuracy of Japanese->Korean translation is about 95%. Sometimes there are missing spaces, and some words are not proper on contexts. For me, I have three advantages for better translation. 


 1) Although I am not good at Japanese, I can read Katakana characters. Japanese Katakana characters are used to write foreign words such as 'flow table' and 'link aggregation'.


 2) There is an English edition of ryu-book (https://osrg.github.io/ryu-book/en/html/). When I do not understand some sentences, I find corresponding English sentences, understand what those sentences mean, and reflect my understanding to Korean sentences.


 3) VisualTran Mate is a good tool which shows original sentences, machine-translated sentences, and my translating sentences simultaneously. This is very powerful because without this help, I might usually press several ALT+TABs, find corresponding sentences displayed in different programs, and compare those sentences.


Finally, I completed my translation, pulled my translation results to the original ryu-book repository, and now my translation results are publicly available.

 pdfmobiepubhtml


First, I would like to very appreciate Ryu-book team. The people in Ryu-book team first made Japanese ryu-book, and then English ryu-book. Without those books, I could not translate well to Korean. Moreover, their GitHub repository is very powerful for collaborating translations with open-source mind. And also, thank you so much for VisualTran Mate, which minimized my lots of manual stuff related to that translation.

'OpenFlow&SDN' 카테고리의 다른 글

Wireshark 1.12.0 well supports OpenFlow 1.0 & 1.3!  (0) 2024.03.09
RYU SDN Framework: Korean Translation  (0) 2024.03.09

(Recovered from my old article - originally posted on 2014.09.13 16:49 KST)


Previously, many developers and engineers needed to add OpenFlow dissector to WireShark to analyze OpenFlow protocol packets in WireShark. It was so difficult stuff, because we needed to match the version of OpenFlow dissector and the version of Wireshark.


According to Wireshark wiki page (http://wiki.wireshark.org/OpenFlow), OpenFlow dissector will be available on Wireshark 1.12.0, and this version was released as 'Stable Release' on 31 July, 2014.


I have downloaded this stable release version and checked that this version well supports both OpenFlow 1.0 & 1.3!


Just download from Wireshark homepage (https://www.wireshark.org/download.html)and install the latest stable release of Wireshark.

After installation, you can see that your Wireshark supports OpenFlow 1.0, 1.3 and 1.4.


I have downloaded & installed Wireshark 1.12.0 on my Windows computer and it worked very well!


[Menu: Supported Protocols]


[Parts from supported protocols]


Here are some screenshots which show that OpenFlow 1.0 & 1.3 filters work very well:


[OpenFlow 1.0: openflow_v1]


[OpenFlow 1.3: openflow_v4]


'OpenFlow&SDN' 카테고리의 다른 글

How I translated Japanese Ryu-book to Korean  (0) 2024.03.10
RYU SDN Framework: Korean Translation  (0) 2024.03.09

(Recovered from my old article - originally posted on 2014.07.26 22:20 KST)


I have finished the draft translation of "RYU SDN Framework", written in Japanese & English.


HTML: http://ianychoi.github.io/ryu-book/ko/html/

PDF: http://ianychoi.github.io/ryu-book/ko/Ryubook.pdf


This book was published in Japanese first, on the early of this year

(http://osrg.github.io/ryu-book/ja/html/)

and after several months, the English edition of this book was also published

(http://osrg.github.io/ryu-book/en/html/).


I'm not good at Japanese, but I mainly used Google translator (http://translate.google.com).

So please give me feedback through github (https://github.com/ianychoi/ryu-book/).


Currently, the PDF edition has line-feed problems.

I think it is because of the conflict between ko.tex & listings packages used in Latex,

but it is a little bit difficult for me to solve this problem..


I hope that more Korean developers will read this book and contribute to SDN worlds!


Note: Ryu is a SDN controller written by Python, and supports various OpenFlow versions: 1.0, 1.2, 1.3 and 1.4.

[UPDATE (March 2024)]


The text below has been around for nearly 10 years as of now, and as such, the specific installation methods and links no longer work. There are resources that explain how to install DevStack in Korean (video from OpenStack Korea User Group & my GitHub Gist), but it would be better for English-speaking users to refer to the latest DevStack documentation. The text below is left for historical purposes.


(Below is my old article recovered from: original post on 2014.04.24 20:17 KST - backup is on web.archive.org)


OpenStack Icehouse was officially released on the last Thursday (Apr 17, 2014).


At that time, I checked on DevStack code base on GitHub, and found that icehouse branch was already created! https://github.com/openstack-dev/devstack/tree/stable/icehouse )

I installed this Icehouse Release. It was a little bit easier than I expected, so I recorded my installation steps and uploaded into YouTube.


I am now practicing my English skills. Although some pronunciations are not well, please see and give comments on my videos.


I installed DevStack using VirtualBox with Ubuntu 12.04 LTS, and I configured network using Neutron.

The followings are YouTube URL information:


#1: Downloading VirtualBox & Ubuntu, and basic Ubuntu installation for DevStack

 - http://youtu.be/zoi8WpGwrXM


#2: Actual DevStack installation steps (Icehouse, Neutron)

 - http://youtu.be/1GgODv34E08


You can download localrc file on http://goo.gl/OeOGqL .


Thank you,


(Recovered from my old article - originally posted on 2014.03.27 23:51 KST)


Network namespaces are supported from Linux kernel 2.6.24. Although this Linux kernel version was announced a few years ago, network namespaces have been unpopular or unknown for many developers and engineers in Korea.

When we configure network using Neutron in OpenStack, we easily see 'ip netns' commands. To understand those commands, we need to know network namespaces.

I translated one article in lwn.net to Korean: http://lwn.net/Articles/580893/. Although this article explains network namespaces with Linux kernel internal details, I really hope that more developers and engineers in Korea better understand network namespaces. : )


(The followings are written in Korean. Thanks!)


네임스페이스 (Namespaces) 운영, part 7: Network namespaces

By Jake Edge
January 22, 2014
 
번역 by Ian Y. Choi,
March 27, 2014 Namespaces in operation
기사 원문을 보시려면 클릭하세요. (Please click this URL if you want to read the original article.)

lwn.net에서 Linux namespace를 다룬지 꽤 되었다. 본 시리즈에서 빠졌던 '네트워크 네임스페이스' 부분을 이제야 채우고자 한다. 이름에서 알 수 있듯이, 네트워크 네임스페이스는 네트워크 장치, 주소, 포트, 라우트, 방화벽 규칙 등의 사용을 각각 분할하여, 별도의 상자(박스)처럼 분리한다. 이를 통해 단일 커널 인스턴스가 실행 중인 환경에서 네트워크를 가상화하는 것이 가능해진다. 네트워크 네임스페이스는 이미 5년 가까이 지난 커널 버전 2.6.24에 추가되었다. (현재와 같이) 자주 쓰일 정도로 준비된 상황까지 발전하기까지는 1년 정도 소요되었는데, 이 때 이후, 네트워크 네임스페이스는 많은 개발자로부터 많이 간과된 측면이 있다.

네트워크 네임스페이스 관리 기본

다른 네임스페이스들과 비슷하게, 네트워크 네임스페이스 역시 CLONE_NEWNET 플래그값을 clone() 시스템 콜에 전달하는 과정을 통해 생성된다. 그러나, 명령 라인 방식으로 실행 가능한 ip 라는 네트워크 구성 도구를 사용하여 네트워크 네임스페이스를 셋업하고 작업하는 것 또한 가능하다. 예를 들면,

    # ip netns add netns1

위 명령어는 netns1라는 새로운 네트워크 네임스페이스 1개를 생성한다. ip 도구가 네트워크 네임스페이스를 하나 생성할 때, /var/run/netns 아래에 해당 네임스페이스를 위한 연결 마운트 지점이 생성될 것이다. 이를 통해, 프로세스들이 해당 네임스페이스 안에 없더라도 네임스페이스가 지속될 수 있도록 하고, 네임스페이스 자체를 변경하는 것을 가능하게 한다. 네트워크 네임스페이스의 경우 사용 전 어느 정도 분량이 되는 구성을 일반적으로 필요로 하기에, 이 특징은 시스템 관리자들에게 많은 도움을 줄 것이다.

"ip netns exec" 명령은 네임스페이스 내에서 네트워크 관리 명령어들을 실행하는데 사용된다.

    # ip netns exec netns1 ip link list
    1: lo: <LOOPBACK> mtu 65536 qdisc noop state DOWN mode DEFAULT 
        link/loopback 00:00:00:00:00:00 brd 00:00:00:00:00:00

이 명령어는 네임스페이스 내에서 보이는 인터페이스들을 열거한다. 네임스페이스는 다음을 통해 제거 가능하다.

    # ip netns delete netns1

이 명령어는 주어진 네트워크 네임스페이스와 연관된 연결 바운트 지점을 제거한다. 그러나, 네임스페이스 자체는 해당 네임스페이스 내 실행되는 프로세스가 실행될 때까지 계속 지속될 것이다.

네트워크 네임스페이스 구성

새 네트워크 네임스페이스에는 다른 네트워크 장치들은 존재하지 않고 루프백 장치 (loopback device) 1개만 있을 것이다. 루프백 장치를 제외하고, 각 네트워크 장치 (물리 또는 가상 인터페이스, 브릿지 등)는 오직 1개의 단일 네트워크 네임스페이스에만 소속된다. 게다가, (실제 하드웨어에 연결된) 물리 장치들은 root 네임스페이스가 아닌 어떤 네임스페이스에도 할당되어질 수 없다. 대신, 가상 네트워크 장치들은 (예: 가상 ethernet, 즉 veth) 생성되어 네임스페이스에 소속될 수 있다. 이 가상 장치들은 프로세스들이 네임스페이스 내에서만 네트워크 통신을 수행하도록 지원한다. 이를 통해 누구와 통신을 할 수 있는지에 대한 대상을 결정하는 구성, 라우팅 등이 이루어진다고 볼 수 있다.

처음 생성되었을 때, 새 네임스페이스 상에 있는 lo 루프백 장치는 down 상태이므로, 루프백 장치에 ping을 수행하면 실패할 것이다.

    # ip netns exec netns1 ping 127.0.0.1
    connect: Network is unreachable
해당 인터페이스를 up을 시키는 과정을 통해 루프백 주소에 ping하는 것이 가능해진다.
    # ip netns exec netns1 ip link set dev lo up
    # ip netns exec netns1 ping 127.0.0.1
    PING 127.0.0.1 (127.0.0.1) 56(84) bytes of data.
    64 bytes from 127.0.0.1: icmp_seq=1 ttl=64 time=0.051 ms
    ...
그러나 여전히 netns1과 root 네임스페이스와는 통신이 불가능하다. 이를 지원하기 위해서는, 가상 ethernet 장치를 생성 및 구성할 필요가 있다.
    # ip link add veth0 type veth peer name veth1
    # ip link set veth1 netns netns1
처음 명령어는 가상 ethernet 장치 한 쌍을 연결된 상태로 만든다. veth0로 보내지는 패킷은 veth1에서 받을 것이고, 그 반대 또한 동작할 것이다. 두 번째 명령어는 veth1을 netns1 네임스페이스에 할당한다.
    # ip netns exec netns1 ifconfig veth1 10.1.1.1/24 up
    # ifconfig veth0 10.1.1.2/24 up
그리고 나서, 이 두 명령어를 통해 IP 주소를 두 장치에 할당한다.
    # ping 10.1.1.1
    PING 10.1.1.1 (10.1.1.1) 56(84) bytes of data.
    64 bytes from 10.1.1.1: icmp_seq=1 ttl=64 time=0.087 ms
    ...
    
    # ip netns exec netns1 ping 10.1.1.2
    PING 10.1.1.2 (10.1.1.2) 56(84) bytes of data.
    64 bytes from 10.1.1.2: icmp_seq=1 ttl=64 time=0.054 ms
    ...
위에서 보여준 ping 명령어에서 보듯이, 양방향 통신이 이제 가능해진다.

언급하였듯이, 그러나, 네임스페이스들은 라우팅 테이블 또는 방화벽 규칙을 서로 공유하지 못한다. netns1에서 route와 iptables -L 명령을 실행함으로써 증명될 것이다.

    # ip netns exec netns1 route
    # ip netns exec netns1 iptables -L
첫 번째 명령은 단순히 (veth1이 사용하는) 10.1.1 서브넷을 위한 패킷들의 경로를 보여줄 것이고, 반명 두 번째 명령은 iptables 구성이 되어 있지 않음을 보여줄 것이다. 두 결과 모두 의미하는 바는, netns1으로부터 인터넷으로 보내지는 다량의 패킷들은 "Network is unreachable"라는 두려운 메시지를 수신할 것이다. 필요한 경우, 네임스페이스를 인터넷에 연결하는 몇 가지 방법이 있다. bridge를 root 네임스페이스와 netns1에 있는 veth 장치에 생성할 수 있을 것이다. 다른 방법으로는, 네트워크 주소 변환 (NAT) 과 결합된 IP 포워딩을 root 네임스페이스에 구성할 수 있다. 이들 중 어떤 방식이든 (그리고 다른 구성할 수 있는 여러 방법들이 있을 것이다.) 패킷들이 netns1으로부터 인터넷에 도달하도록 하고 해당 패킷들에 대한 응답이 netns1에 도달하도록 하는 것이 가능할 것이다.

네임스페이스에 할당된 (clone(), unshare(), 또는 setns()를 통해) root 권한으로 실행되지 않는 프로세스들은 이미 셋업된 네트워크 장치 및 구성에 대해서만 접근 가능하다-물론, root 사용자는 새로운 장치들을 추가하고 구성할 수 있다. ip netns 서브 명령을 사용하여, 네트워크 네임스페이스를 지칭(address)하는 두 가지 방법이 존재한다. 그 중 하나는 netns1과 같은 이름을 사용하는 것이고, 다른 하나는 해당 네임스페이스 내에 있는 프로세스의 프로세스 ID (PID)을 통한 방법이다. init이 일반적으로 root 네임스페이스 내에 존재하므로, 다음과 같은 명령어를 사용할 수 있다.

    # ip link set vethX netns 1
저 명령어를 통해 (짐작컨데, 새로 생성된) veth 장치를 root 네임스페이스에 위치시키고, 다른 네임스페이스 상에서 root 사용자가 동작시킬 수 있을 것이다. root 사용자가 네트워크 네임스페이스 내에서 이와 같은 운영을 수행 가능하게하는 것이 적절하지 않은 상황일 수도 있겠지만, PID와 네임스페이스 마운트 기능은 다른 네트워크 네임스페이스들에 도달하지 못하도록 사용될 수도 있을 것이다.

네트워크 네임스페이스 사용

이제까지 살펴보았듯이, 네임스페이스의 네트워크 동작은 아무것도 동작하지 않는 상태 (즉, 단순히 루프백만 존재하는 경우)부터 시스템 네트워크 동작에 대한 모든 접근까지 가능하도록 할 수 있다. 이를 통해 수많은 다양한 네트워크 네임스페이스를 사용한 유스케이스가 있을 것이다.

본질적으로 네임스페이스 내에서 네트워크를 끔으로써, 관리자들은 해당 네임스페이스 내에서 실행되는 프로세스들이 네임스페이스 밖으로 접속을 생성하지 못하도록 보장할 수 있다. 해당 프로세스가 보안 취약점과 같은 과정을 통해 감염되더라도, 네임스페이스는 botnet에 참여하거나 스팸을 보내는 것과 같은 행동들을 못하도록 해줄 것이다.

심지어 네트워크 트래픽을 다루는 프로세스들 (예: 웹 서버 worker 프로세스 또는 웹 브라우저 렌더링 프로세스) 또한 제한된 네임스페이스로 위치시킬 수 있다. 외부 지점에 의해, 또는 외부 지점으로 향하는 접속 하나가 생성되면, 해당 접속을 위한 파일 디스크립터 (file descriptor)는 clone() 시스템 콜에 의해 생성된 새로운 네트워크 네임스페이스의 자식 프로세스에 의해 관리 가능하다. 자식은 부모의 파일 디스크립터들을 모두 상속받을 것이기에, 해당 자식 프로세스는 접속된 디스크립터에 대한 접근 권한이 있다. 또 다른 가능성으로는 부모가 파일 디스크립터들을 제한된 네트워크 네임스페이스 내에 있는 프로세스에 Unix 소켓을 통해 보낼 수도 있다. 어떤 경우라도, 적절한 네트워크 장치가 해당 네임스페이스에 존재하지 않으면 자식 또는 worker 프로세스가 부가적인 네트워크 접속을 생성하는 것이 불가능할 것이다.

네임스페이스는 모든 것들이 단일 박스에서 동작하는 다소 복잡한 네트워킹 구성을 필요로 하는 환경에서 테스트하는 데 사용할 수도 있다. 보다 락-다운인 상황에서 실행되어야 하는 민감한 서비스들, 그리고 방화벽이 제한된 네임스페이스 또한 해당될 수 있다. 분명한 것은, 컨테이너 방식의 구현 또한 네트워크 네임스페이스를 사용하여 각 컨테이너에 각 네트워크만의 뷰를 제공하고, 해당 컨테이너 바깥과는 자유로운 공간을 만든다는 것이다. 이와 같이 한다면, 다양한 유스케이스들이 탄생할 수 있을 것이다.

일반적으로 네임스페이스는 시스템 자원을 분할하고, 프로세스를 그룹별로 묶어 다른 자원들로부터 격리시키는 방법을 제공한다고 할 수 있다. 네트워크 네임스페이스 역시 다른 많은 부분의 네임스페이스와 동일하지만, 네트워킹이 보안적으로 민감한 부분에 해당하기에, 여러 방법을 사용한 네트워크 격리를 제공하는 것은 굉장히 가치가 있을 것이다. 물론, 여러 네임스페이스 유형을 함께 사용한다면 보안 및 다른 필요성을 위한 보다 나은 격리를 제공할 것이다.

(Recovered from my old article - originally posted on 2014.03.17 02:42 KST)


There are many new terms when seeing OpenStack network parts: Nova-Network, Neutron (Quantum), ML2, ... (ML2 is a plugin which supports from Havana)

I am now posting my blog article to summarize network parts in OpenStack.


OpenStack has been evolving to support the connection between hosts and from/to external network. The following describes the summary of modules/projects as a chronological manner.


Nova-Network: Nova is a project name in OpenStack, which manages hypervisors. Initially, Nova supported not only the management of virtual machines (the creation & deletion of instances), but also the management of virtual network interfaces and their connection. Nova-network is a module which mainly deals with network part in Nova project.

- Quantum: Quantum project was included in OpenStack Folsom version. It was originally designed to separate network parts from (complex) Nova project.

- Neutron: OpenStack changed the name of "Quantum" to "Neutron". (Many people says that there should be some copyright issues..)

ML2: Included in Havana. ML2 was developed as a form of Neutron plugins.


When we talk IP addresses in OpenStack, we can easily hear two terms: "Fixed IP" and "Floating IP". Those two terms can be confused with 'Static IP' and 'Dynamic IP'. Those two terms are generally used when we configure IP addresses on hosts. Please do not think that "Fixed IP" and "Floating IP" are analogous to 'Static IP' and 'Dynamic IP'!

Fixed IP is an IP address which is allocated to exactly one instance when created. Only one instance should have one distinguished fixed IP address, and that fixed IP address can be freed when the instance is terminated.

On the other hand, Floating IP is an IP address which can be temporally allocated and unallocated. One use-case of using floating IP is 'Using public IP addresses in OpenStack environment'. One Public IP address can be allocated to one instance when the instance is serviced to the public network. In addition, one instance can have multiple public IP addresses when the instance deals with multiple public network connections simultaneously.


In Essex, there were three ways to implement fixed IPs in Nova-Network: Flat Mode, Flat DHCP Mode, VLAN DHCP Mode. Flat Mode means that users need to configurre fixed IP addresses manually. Flat DHCP mode makes use of dnsmasq processes to allocate IP addresses with DHCP functionality. And, VLAN DHCP mode makes use of VLAN tags to group virtual machines and each group has an unique vtag number & a dnsmasq process to manage fixed IP addresses in the group. 


Quantum supports plugins, which is analogous to nova-scheduler in Nova. The architecture using Quantum plugins is to support various network implementations in OpenStack. There are many implementation cases in OpenStack network: Linux bridge, OpenvSwitch, MS Hyper-V network, and so on. The support of various implementations can be accomplished just by replacing to Quantum plugins. There are many built-in plugins (Hyper-V, Linux bridge, OpenvSwitch), and third party plugins (e.g., Floodlight, ryu).


(Source: http://pt.slideshare.net/kamesh001/whats-new-in-neutron-for-open-stack-havana)


ML2 is the abbreviation of 'Module Layer 2' and is designed to support multiple network layer-2 implements simultaneously with a modular form, which is introduced in Havana. WIthout using ML2, every host should use the same network layer-2 implementations.

+ Recent posts