This post contains the information while participating in the AEWS (Amazon EKS Workshop Study) study by CloudNet@.
1. Amazon EKS Introduction
According to the official Amazon EKS User Guide (link), Amazon Web Services (AWS) describes it as a managed service that eliminates the need to install, operate, and maintain a Kubernetes control plane. There is a diagram of the control plane in the open-source Kubernetes documentation (link) that explains the architecture of a Kubernetes cluster.
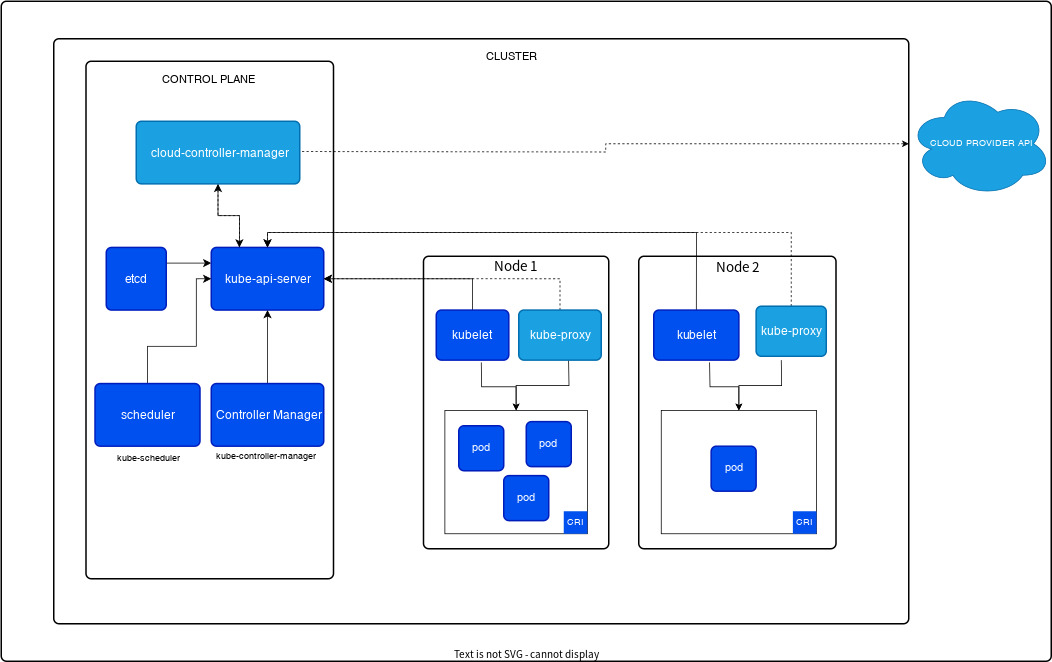
In the image regarding the control plane, there are five components: cloud-controller-manager, etcd, kube-api-server, scheduler, and Controller Manager. Instead of installing and managing these components directly, by creating a managed service like Amazon EKS, one can utilize Kubernetes nodes. For more detailed information, refer to the EKS workshop description (link).
The open-source Kubernetes can be checked for newly updated versions through the link https://github.com/kubernetes/kubernetes/releases, where detailed explanations of the version numbers are also available at link.
x.y.z | x: major version, y: minor version, z: patch version
2. EKS Workshop environment and EC2 bastion VM configuration
For this study, we prepared our AWS accounts in advance following the "Start with an AWS Account" section in the EKS workshop. For setting up the practical environment, tasks ranged from setting up AWS Cloud9, installing kubectl, to installing eksctl. Thanks to the AWS CloudFormation prepared by our study leader, Mr. Kasida, we were able to participate in the study comfortably. Based on March 2024, the time of conducting this study, we chose version v1.28 for EKS, which supports add-ons and is among the most compatible and validated versions with numerous applications within the K8s ecosystem. To understand the AWS environment we are working within during the study, we referenced AWS architecture icons and schematically represented it as follows..

After downloading the CloudFormation template as described below, we tried executing it using the AWS CLI (link).
$ curl -O https://s3.ap-northeast-2.amazonaws.com/cloudformation.cloudneta.net/K8S/myeks-1week.yaml
  % Total    % Received % Xferd  Average Speed   Time    Time     Time  Current
                                 Dload  Upload   Total   Spent    Left  Speed
100 10373  100 10373    0     0   180k      0 --:--:-- --:--:-- --:--:--  180k
$ aws cloudformation deploy --template-file myeks-1week.yaml --stack-name myeks --parameter-overrides KeyName=kp-ian SgIngressSshCidr=$(curl -s ipinfo.io/ip)/32 --region ap-northeast-2

Waiting for changeset to be created..
Waiting for stack create/update to complete
Successfully created/updated stack - myeks
After executing the following command, you can find out the IP address, and by using this IP address to run SSH, you can access the Shell and proceed with the subsequent tasks. The SSH ID and Password to connect can be found in the above CloudFormation template file, so please refer to it.
aws cloudformation describe-stacks --stack-name myeks --query 'Stacks[*].Outputs[*].OutputValue' --output textOnce you've accessed the working EC2 instance, it's necessary to configure IAM user credentials. For the convenience of the practice, enter the credentials of an IAM User with administrator privileges.
[root@myeks-host ~]# aws ec2 describe-instances

Unable to locate credentials. You can configure credentials by running "aws configure".
[root@myeks-host ~]# aws configure
AWS Access Key ID [None]: AKI..........
AWS Secret Access Key [None]: FQ.......................
Default region name [None]: ap-northeast-2
Default output format [None]: json
[root@myeks-host ~]# aws ec2 describe-instances
{
    "Reservations": [
        {
            "Groups": [],
            "Instances": [
                {
                    "AmiLaunchIndex": 0,
                    "ImageId": "ami-025cebb6913219d99",...........
3. Cluster creation using eksctl
In the EKS workshop content (link), clusters are created using the eksctl command with yaml files. However, it's also possible to pass basic options directly to the eksctl command in the appropriate parameter format, and this method was explored in the study. The necessary option values were stored and utilized as environment variables.
3.1. Environment variables
The $AWS_DEFAULT_REGION and $CLUSTER_NAME environment variables are already prepared on the working (bastion) EC2 instance. We checked these and then went ahead to set up the remaining environment variables.
[root@myeks-host ~]# echo $AWS_DEFAULT_REGION
ap-northeast-2
[root@myeks-host ~]# echo $CLUSTER_NAME
myeks
[root@myeks-host ~]# export VPCID=$(aws ec2 describe-vpcs --filters "Name=tag:Name,Values=$CLUSTER_NAME-VPC" | jq -r .Vpcs[].VpcId)
[root@myeks-host ~]# echo "export VPCID=$VPCID" >> /etc/profile
[root@myeks-host ~]# export PubSubnet1=$(aws ec2 describe-subnets --filters Name=tag:Name,Values="$CLUSTER_NAME-PublicSubnet1" --query "Subnets[0].[SubnetId]" --output text)
rt PubSubnet2=$(aws ec2 describe-subnets --filters Name=tag:Name,Values="$CLUSTER_NAME-PublicSubnet2" --query "Subnets[0].[SubnetId]" --output text)
echo "export PubSubnet1=$PubSubnet1" >> /etc/profile
echo "export PubSubnet2=$PubSubnet2" >> /etc/profile
[root@myeks-host ~]# export PubSubnet2=$(aws ec2 describe-subnets --filters Name=tag:Name,Values="$CLUSTER_NAME-PublicSubnet2" --query "Subnets[0].[SubnetId]" --output text)
[root@myeks-host ~]# echo "export PubSubnet1=$PubSubnet1" >> /etc/profile
[root@myeks-host ~]# echo "export PubSubnet2=$PubSubnet2" >> /etc/profile
[root@myeks-host ~]# echo $VPCID
vpc-06019251cc08c519b
[root@myeks-host ~]# echo $PubSubnet1,$PubSubnet2
subnet-09c63523c434bcaec,subnet-0244ef5fa73c2f986
3.2. EKS cluster creation
Once the preparation is complete, you can execute the following command to proceed.
eksctl create cluster --name $CLUSTER_NAME --region=$AWS_DEFAULT_REGION --nodegroup-name=$CLUSTER_NAME-nodegroup --node-type=t3.medium \
--node-volume-size=30 --vpc-public-subnets "$PubSubnet1,$PubSubnet2" --version 1.28 --ssh-access --external-dns-access --verbose 4
It will take about 15-20 minutes, so let's wait for a bit. In the meantime, opening another terminal and executing the following command will help check whether the cluster has been created.
while true; do aws ec2 describe-instances --query "Reservations[*].Instances[*].{PublicIPAdd:PublicIpAddress,PrivateIPAdd:PrivateIpAddress,InstanceName:Tags[?Key=='Name']|[0].Value,Status:State.Name}" --filters Name=instance-state-name,Values=running --output text ; echo "------------------------------" ; sleep 1; done
Once the cluster creation is complete, the terminal status will change as follows.
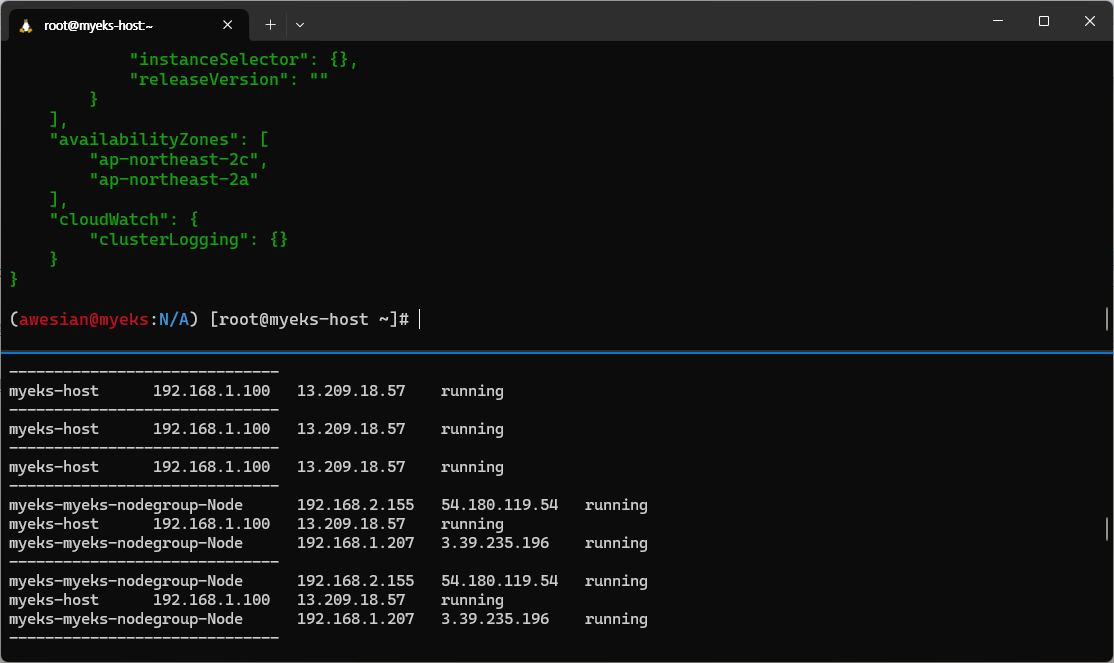
You can also check the deployed EKS details in the AWS console (if the console hasn't refreshed, try clicking the refresh button).


After the EKS cluster creation is complete, you can execute various commands on the EKS cluster using the kubectl command. During the study, we tried various things and confirmed many aspects, but I intend to document just one of those in the blog.
4. Check the created EKS cluster - endpoint access (Public -> Public and private)
To check the information of the EKS cluster, you can use the command "kubectl cluster-info".
(awesian@myeks:N/A) [root@myeks-host ~]# eksctl get nodegroup --cluster $CLUSTER_NAME --name $CLUSTER_NAME-nodegroup
CLUSTER NODEGROUP       STATUS  CREATED                 MIN SIZE        MAX SIZE        DESIRED CAPACITY        INSTANCE TYPE   IMAGE ID        ASG NAME              TYPE
myeks   myeks-nodegroup ACTIVE  2024-03-09T18:02:34Z    2               2               2                       t3.medium       AL2_x86_64      eks-myeks-nodegroup-eac71230-bb27-1b00-6c14-e2c96dfc5646       managed
(awesian@myeks:N/A) [root@myeks-host ~]# kubectl cluster-info
Kubernetes control plane is running at https://088CD22A78682CF5F017CFEE329E3C1A.gr7.ap-northeast-2.eks.amazonaws.com
CoreDNS is running at https://088CD22A78682CF5F017CFEE329E3C1A.gr7.ap-northeast-2.eks.amazonaws.com/api/v1/namespaces/kube-system/services/kube-dns:dns/proxy

To further debug and diagnose cluster problems, use 'kubectl cluster-info dump'.
Additionally, the "eksctl get cluster" command can also be used to check the information. One notable point was that the created endpoint was public. Being public means that the endpoint is accessible over the network. To proceed with actions like creating Pods through this endpoint, additional authentication is required. However, for simple tasks like version checking, access to the created EKS cluster was possible without any separate authentication when the endpoint is public.

Even when checked from the console, the API server endpoint access is listed as "Public".

Let's change the API server endpoint access to "Public and Private". To detect changes, we can use a total of three terminals. Two of these terminals will be used for monitoring purposes.
# Terminal A - for monitoring
APIDNS=$(aws eks describe-cluster --name $CLUSTER_NAME | jq -r .cluster.endpoint | cut -d '/' -f 3)
dig +short $APIDNS
while true; do dig +short $APIDNS ; echo "------------------------------" ; date; sleep 1; done

# Terminal B - for another monitoring
N1=$(kubectl get node --label-columns=topology.kubernetes.io/zone --selector=topology.kubernetes.io/zone=ap-northeast-2a -o jsonpath={.items[0].status.addresses[0].address})
N2=$(kubectl get node --label-columns=topology.kubernetes.io/zone --selector=topology.kubernetes.io/zone=ap-northeast-2c -o jsonpath={.items[0].status.addresses[0].address})
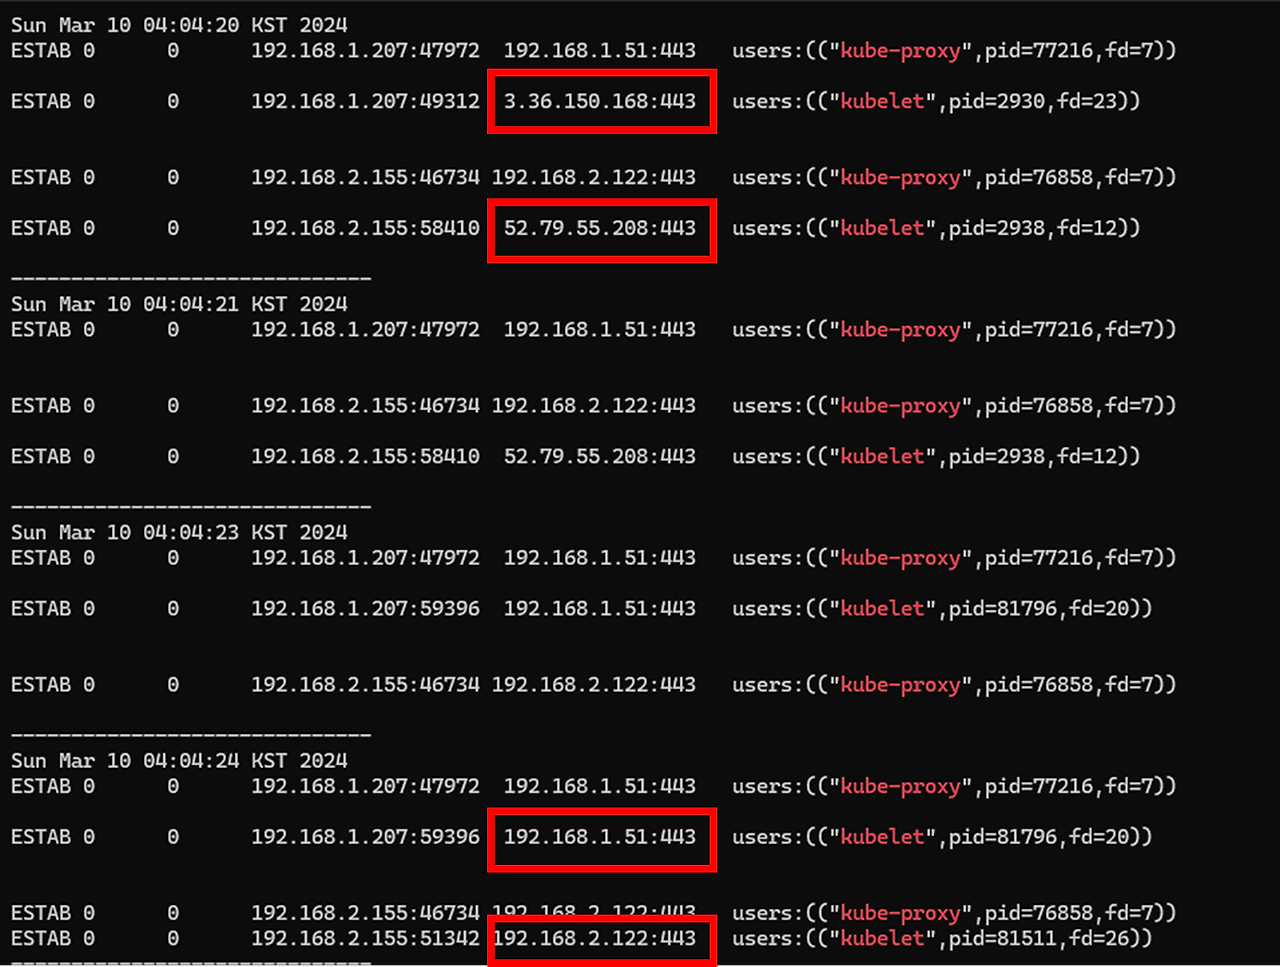
while true; do ssh ec2-user@$N1 sudo ss -tnp | egrep 'kubelet|kube-proxy' ; echo ; ssh ec2-user@$N2 sudo ss -tnp | egrep 'kubelet|kube-proxy' ; echo "------------------------------" ; date; sleep 1; done

# Terminal C - Public(with only one IP address)+Private. It will take 8-10 minutes.
aws eks update-cluster-config --region $AWS_DEFAULT_REGION --name $CLUSTER_NAME --resources-vpc-config endpointPublicAccess=true,publicAccessCidrs="$(curl -s ipinfo.io/ip)/32",endpointPrivateAccess=true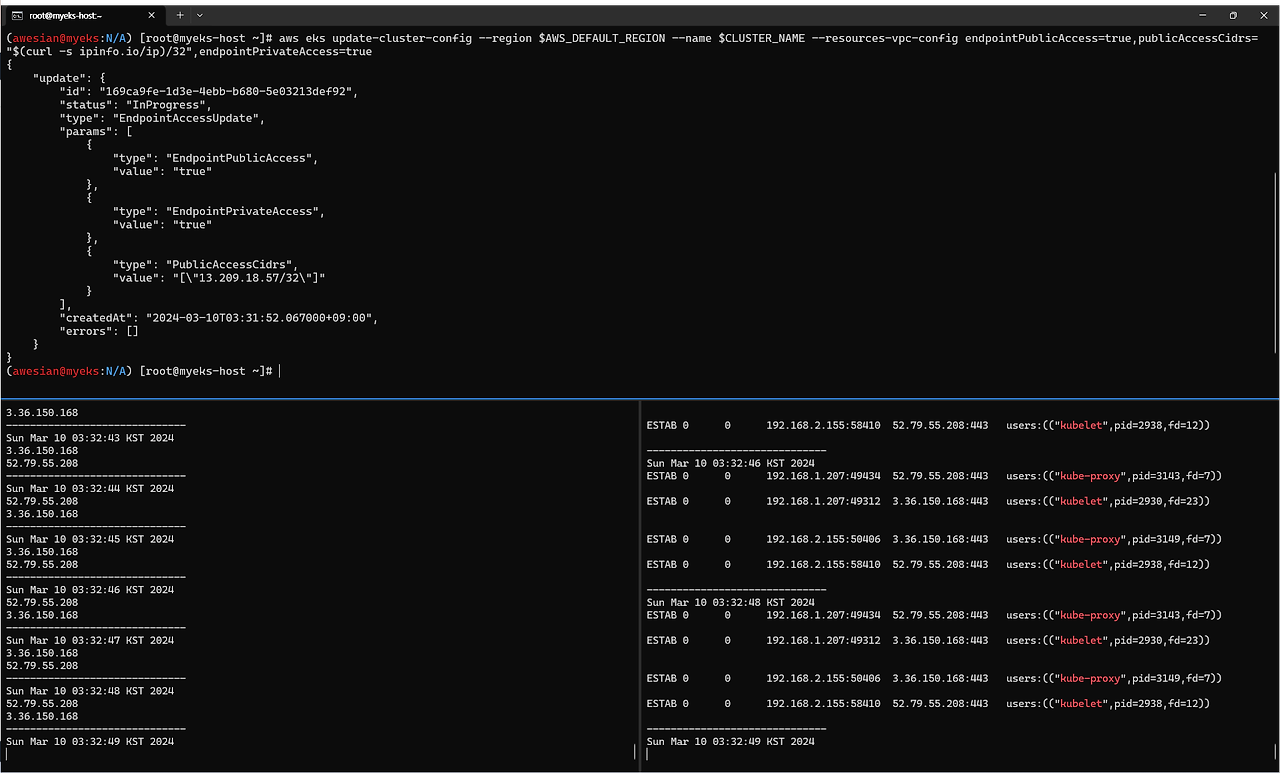
After waiting, you can observe in Terminal A that the section previously displaying 2 public IPs has suddenly changed to internal network subnets.

The lack of change on the right side may be because, with both Public and Private options activated, there's no need to terminate existing network connections that kube-proxy and kubelet have already established.
After the change, executing "kubectl" commands may not work. Attempting to run it could result in an error message, indicating that the visible IP address is not a Public IP. This implies that, with the cluster settings altered, the Endpoint now returns a Private IP.
(awesian@myeks:N/A) [root@myeks-host ~]# kubectl get node -v=6
I0310 03:44:52.743735   18383 loader.go:395] Config loaded from file:  /root/.kube/config
I0310 03:45:23.611890   18383 round_trippers.go:553] GET https://088CD22A78682CF5F017CFEE329E3C1A.gr7.ap-northeast-2.eks.amazonaws.com/api/v1/nodes?limit=500  in 30861 milliseconds
I0310 03:45:23.612005   18383 helpers.go:264] Connection error: Get https://088CD22A78682CF5F017CFEE329E3C1A.gr7.ap-northeast-2.eks.amazonaws.com/api/v1/nodes?limit=500: dial tcp 192.168.1.51:443: i/o timeout
Unable to connect to the server: dial tcp 192.168.1.51:443: i/o timeout
(awesian@myeks:N/A) [root@myeks-host ~]# kubectl cluster-info

To further debug and diagnose cluster problems, use 'kubectl cluster-info dump'.
Unable to connect to the server: dial tcp 192.168.2.122:443: i/o timeout
Connection timeout implies that you need to make additional settings in the EKS Control plane security group to enable access to the subnet. Using the following command, an additional rule was set in the node security group to allow access to the node (pod) from myeks-host.
# EKS ControlPlane Security Group ID
aws ec2 describe-security-groups --filters Name=group-name,Values=*ControlPlaneSecurityGroup* --query "SecurityGroups[*].[GroupId]" --output text
CPSGID=$(aws ec2 describe-security-groups --filters Name=group-name,Values=*ControlPlaneSecurityGroup* --query "SecurityGroups[*].[GroupId]" --output text)
echo $CPSGID

# Add a rule to enable connection from myeks-host to nodes (pods) in the security group
aws ec2 authorize-security-group-ingress --group-id $CPSGID --protocol '-1' --cidr 192.168.1.100/32
Also, let's change the settings for kubelet and kube-proxy to connect to private IP addresses. Run the following command:
# kube-proxy rollout
kubectl rollout restart ds/kube-proxy -n kube-system

# Kubelet is applied by running systemctl restart kubelet on individual nodes. The $N1 and $N2 environment variables must be set.
for i in $N1 $N2; do echo ">> node $i <<"; ssh ec2-user@$i sudo systemctl restart kubelet; echo; done
After running the first command above, you can see that the connection to kube-proxy is made with a private IP.
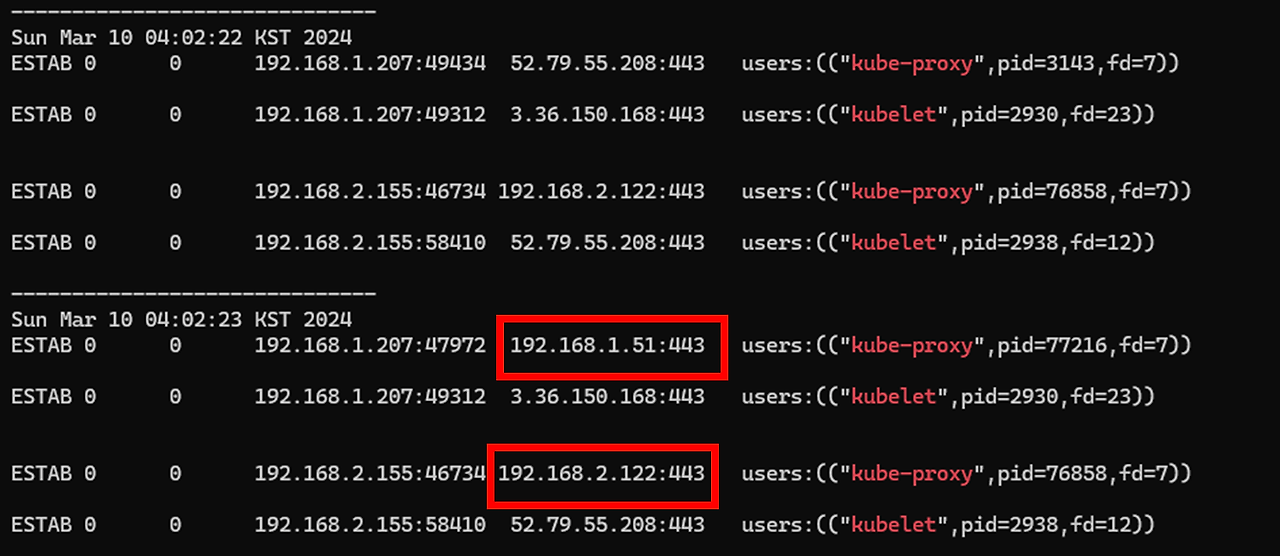
If the second command runs successfully, you can see that the kubelet is also connecting to the private IP.
5. Resource deallocation
After completing the exercise, be sure to delete resources to minimize unnecessary costs.
- Deleting an Amazon EKS cluster (takes about 10 minutes): eksctl delete cluster --name $CLUSTER_NAME
- To delete the AWS CloudFormation stack after the above process is completed: aws cloudformation delete-stack --stack-name myeks

'Amazon EKS (Elastic Kubernetes Service)' 카테고리의 다른 글
| [AEWS] Study Week 6 - EKS Security (0) | 2024.06.10 |
|---|---|
| [AEWS] Study Week 5 - EKS Autoscaling (0) | 2024.06.10 |
| [AEWS] Study Week 4 - Observability (0) | 2024.06.10 |
| [AEWS] Study Week 3 - EKS Storage & Nodegroup (0) | 2024.06.10 |
| [AEWS] Study Week 2 - EKS Networking (0) | 2024.03.17 |